Monday, May 6, 2013

DIY - Basement laundry room gets a floor!

Hello everyone!  Thanks for stopping by to see our progress on the basement laundry room.  I can say that it is coming along nicely and I am getting excited about getting it finished.

The first portion of the room that we tackled was the floor.  I had read about a peel and stick floor from one of my favorite blogs, Thistlewood Farms in her Butler's Pantry and I loved the look.  We purchased the tiles from Lowe's Home Improvement.

Here is the first tile going down.  The most challenging part of this process was just making sure that we were starting dead center.  You can see that hubby drew "chalk" lines to ensure that he was not going to have to pull out his luscious hair (that most men his age are envious of... HA!) once he reached the side of the room.  He did a great job and there was no need to pull any hair.

We decided to go with Karianne's same look from her Butler's Pantry.  The alternating tiles amp up the look of quality in the room.   I really like it.


The areas that needed less than a full tile were easy to conquer as well.  He just took an x-acto knife and scored the tile where he needed it cut.  Very simple indeed!


Harley Dent was checking the new floor out.  There she is in the lower right hand corner... She's always where her "Mom" is... 


The door on the left goes to my studio, the door on the right is to our daughter's bedroom/guest bedroom.  The stairs are behind the wall on the left and the bathroom door is not seen but is located on the left next to the wall.  This picture was taken before hubby made the cuts to the odd piece there by the wall.  

What do you think of our floor?  If you have the need for a new floor, this is an inexpensive and simple alternative.  And I feel the results take the floor up a notch.

 Stay tuned for more updates as the room is coming along.  

xoxo,

Tracy

"Others have seen what is and asked why.  I have seen what could be and asked why not."  Pablo Picasso

Thursday, May 2, 2013

Recipes Rebooted - Chicken Fajita Tacos

Have you ever experienced the phenomenon where you plan something to cook knowing feeling confident that you have all the ingredients?... Only to discover that you are missing a KEY ingredient as your food is on the stove cooking?

That is what happened to me the other day when I decided to use my pretty bell peppers to create fajitas.  Only... I had NO flour tortillas.  NONE.  Completely out...

My food was bubbling happily in the skillet and I had no flour shells.  So, I improvised.  I yelled "We are having Chicken Fajita TACOS for dinner!"  My family was intrigued about the change and eagerly waited while their taste buds were jumping in anticipation.  Okay, maybe that was a stretch.

Make no mistake, there is usually no taco that this family does not enjoy.  We are a taco loving bunch.  So, it seemed like a good idea.  And this was no exception.  It was really delicious!  

Take a look....

 Take your boneless/skinless chicken breasts and season them with THIS amazing seasoning. OR, if you must have Mexican food at least 4 - 5 times a week like me, you can buy it in BULK here.   It is SO yummy I highly recommend you getting the "big boy".  I had to actually purchased my current batch while visiting my Aunt in Texas.  Our stores had quit stocking it because us southerners apparently prefer grits and fried green tomatoes instead of Tex-Mex. 


Season it liberally.  No real science here.

While your chicken is "marinating", you can cut up your bell peppers and onions.  Again, there does not really need to be a recipe on this one.  Just cut up as much as your family likes to eat.  It's really simple... I promise....

And place them in a pan with a little butter to start the sauteing.  

Cook over medium heat until they are soft.

Remove the vegetables and set aside.  Now, cut your chicken into strips and place in the same pan.  All that delicious flavor will transfer onto the chicken along with the fajita seasoning.  Yummy!

You will want to cook the chicken about 4 minutes on each side.

When 8 minutes are up, place the vegetables back in the pan with the chicken and give it a stir.  

I make my corn shells from scratch instead of buying the hard, crunchy kind.  I just prefer them.   They are easy to cook.  You just need corn tortilla shells, a small pan, and a small amount of vegetable oil in the bottom of the pan.  You will need to heat the oil until it is hot.  

Do you know a quick way to determine if the grease is hot enough?  Once the oil is heated for a few minutes, take the handle of a wooden spool and place it in the oil.  If you see bubbles around the handle, the oil is ready for frying!

When cooking the shells, I usually lay them in flat and one at the time.  I cook one side for about 20 seconds and flip it over to the other side for another 20 seconds.  Once the shell begins to firm up, I fold the shell in half and let it fry for a few more seconds to set the "fold". 

Top your "TACOS" with whatever topping you prefer.  Here, I have tomatoes, cheese dip and cheese.   (Don't show this post to my doctor who is treating me for high cholesterol....)  Sometimes I add sliced black olives, or avocados, or salsa...  It really is up to you.


Have you cooked anything yummy lately?  Leave a comment and tell us all about it!

xoxo,

Tracy 


“The principal mark of genius is not perfection but originality, the opening of new frontiers.”
Arthur Koestler

Wednesday, May 1, 2013

DIY - Laundry Room Move

As I have stated here, when hubby and I moved into our current home, we downsized quite a bit.  Our children were grown and we only had one left at home.  And she was on her way out anyway as she was headed off to college.  

It was time to for us to think about our future without children living with us.  So we went with a smaller house where the main living is on one floor.  However, this house has the potential of actually being bigger than our previous home because it has an unfinished basement.  SCORE!  

Since we have moved in, we have created a bathroom and a bedroom in the space.  Click on the links to see those posts.  

We still have quite a bit more to do, but as you know, home improving takes time and money.  And hubby and I love doing it ourselves, so the basement was a WIN/WIN for us.

One of the areas that we sacrificed when we moved was a laundry room.  Our new home has a laundry "closet".  Boy, has THAT been a challenge!   This room is so small that we have to angle our dryer in this closet because we cannot get the dryer door open otherwise. 


We had installed some stock cabinets that we had purchased from Lowe's over the washer and dryer.  That helped somewhat with organizing our laundry supplies.  As you can see from this picture, the dryer is slightly skewed in order to have access to the inside.  Oy' vey! 


The dryer also acts as a "storage of junk" space.  Do you have that space in your home too?  

It's those things that just seem to not have "a home at the moment" and it totally frustrates me!  (Breathe, Tracy, Breathe...)

So hubby came up with a good idea.  Why not move this laundry room to the basement in the area between the bathroom and the bedroom?  We can make it a beautiful space with lots of room!  And this existing laundry closet will become a large pantry right outside of our kitchen.
I JUMPED on the idea!  As an avid blog reader, I had just seen THIS blog post from Thistlewood Farms.   (I LOVE her blog!  You need to check her out.)   Oh the glorious beauty of that floor...  And that ROOM!  The wheels were spinning in my head. 

This is Karianne's room from her blog.


The floor is simple!  AND cheap!!!  AND perfect for a basement floor that still seems to find ways to spew water (we think we have solved all issues at this point.) 

Here is the room before.  The floor was initially painted, but we have had 4 different issues with water in this space and that's why it is peeling.  The door here goes into our guest bedroom that we built ourselves.


Same wall, just moved down a tad with my camera.


Here is the back wall.  The wall on the left of this picture is the bedroom wall and the wall on the right side is the bathroom wall.  The stairs are to the right of the photographer (me!).  The oven that you see there will be placed into my kitchen upstairs as soon as we get the parts to fix it.


Can't you just picture a washer and dryer there in front and to the left a folding counter with lots of cabinets?  I can!


 What a mess.  I will be so glad to give this space an identity!


So keep coming back for our transformation.  Our floor is already in and hubby is working on the walls to lay the sheet rock.  I'll post an update soon!

Thanks for visiting!

xoxo,

Tracy


"Learn the rules like a pro, so you can break them like an artist."  Pablo Picasso


 I'm linking up with Savvy Southern Style's Wow Us Wednesday


Tuesday, April 30, 2013

Wayfair.com

UPDATE: (2:31 E.D.T)  I bought those red chairs below with 15 minutes to spare!  I hope you are looking at Wayfair's Daily Deals!  I cannot wait to show you my chairs on the deck when I get them.   And I got free shipping too!! 

Recently, in my travels throughout "Blogland" (if you have never been there, you should visit!),  I've stumbled upon a a website called Wayfair.com.  Have you heard of it yet? 

Sidebar:  I should start this post out by saying I am in no way affiliated with Wayfair.com.  This is my own personal opinion. 

And my opinion says "WOWZA!"  They have some really nice stuff and their deals of the day are phenomenal.  Each day I get an email in my inbox with many deals of the day and their low prices.  Let me give you a few:

Take a look at this Griffin 3 Piece Seating in Red.  It's $127.00!!!


And what about this outdoor rug?


It's only $80.00!

Check them out and be sure to sign up for the Daily Deals.  I do not believe you will be sorry!

xoxo,

Tracy

"Imagination is everything.  It is the preview of life's coming attractions."  Albert Einstein

Monday, April 29, 2013

DIY - Mom's Bathroom Remodel - Update

If you have been reading my blog this year, you know that my hubby was remodeling my mom's master bathroom. You can read the beginning HERE

Well, it is 95% finished.  (I know you have been holding your breath in anticipation!)  

(Hello?  Anyone out there?  ;-.))

Because hubby did most of this while I was working, I do not have many photos of the "during".

Here is the bathroom now:


Mom chose a unique tile that looks like old barn wood. 

She kept the shower floor lighter and we really liked this small square pattern.  This tile was purchased in sheets at Lumber Liquidators. 

The sides are capped with a decorative tile that adds a little femininity to the shower.  She also got this tile at Lumber Liquidators.

This might be my favorite part of the bathroom.  My parents bought this antique dresser and it was painted with white paint that was peeling off.  My step-dad refinished it to this beautiful masterpiece.  They used it as their sink base.   Sorry for the fuzzy picture!

My mom's sink base which was purchased at Home Depot online...


And their floor....  It was purchased at Lowe's.

Their whole bathroom is enveloped with warmth.  Not only because of the wood tones, but there is a heated floor underneath!  Mom said this is her kitty's favorite new spot!

Hubby does have a few more things to take care of like finishing off the linen closet the old/small shower was and putting in the baseboards.  I think he did a great job.

What do you think?


"The worst  enemy to creativity is self-doubt."  Sylvia Plath

xoxo,

Tracy

I'm participating in Metamorphosis Monday over at Susan's porch.  Join us there for lots of Before and Afters. 


Friday, April 26, 2013

Fashion Friday - Apples

Okay, before I get started today with my weekly fashion faux pas (and if you have read my other fashion posts, you know one is coming...), I want to say that my "Fashion Friday" title may be the result of my addiction to blogs.  As I was reading through some of my favorite blogs, I realized that there are a lot of us that use the "Fashion Friday" title to talk about, well... Fashion.  

And in my defense, I was not copying....  At least, I did not realize I was... It just rolled around in my head until I thought "Fashion Friday!  That's sounds like a great title and it forces me to show off my lack of style every Friday!"  I have to say that it just sounds right.... It rolls off the tongue...  It's "cutesy"...  

Roll with it friends!


On to fashion:  Unless you live under a rock, you most likely have seen men walk around with their pants hanging off their bum....  (On behalf of all of us moms, this just looks ridiculous.  Seriously...)

Justin Bieber... You know his momma is probably cringing... "I taught that boy better!"  Okay, maybe that is what I would have said if he was my son...    Really?

So you can imagine what I said when I noticed this:

Yep, that's my pants with my crotch almost to my knees... Okay, almost halfway to my knees...  (This New Year's resolution to "not exaggerate as much" is getting on my nerves!)  Do you think I could start a new trend with this look?  Middle-aged women with low hanging crotches?  

That last phrase sounded better in my head.

  And yes, my zipper does not lay down flat....  Why am I still wearing these?

On Fridays, it is "bluejeans" day at work.  We pay $5.00 for the privilege to wear the jeans and that money goes to a local charity.  I like my little bluejeans Capri pants.  Because I get hot easily, I cannot wear bluejeans all summer long.  So these Capri pants fit the bill.  But I think pants that fit are a better choice.  

My body type is an "apple".  Which basically means that I carry my extra weight in my upper torso with most of my weight focused in my mid-section.  (Lucky me!)  My legs are thinner than the rest of my body and it can make buying pants a problem.  If I get them to fit around my tummy, they generally hang around my legs, hence the sagging crotch.  


With my new commitment to learn how to style myself, I wondered how an "apple" should dress.  

So I "googled"....  Googling is my favorite.

Here are some fashion tips for all of us "apples" out there:

Pants:  
  1. Wear boot cut or wide leg.  What I've been reading is apples cannot wear skinny jeans under any circumstance.  I protest this.  And I will capture pictures in a later post to get your thoughts.  I protest this because I LOVE skinny jeans/pants with the right pair of shoes.  Like a pair of boots... or some wedges.  Sometimes, I want to wear a skinny pant.
  2. Wear stretchable fabric.  (Duh.)  Stretchable fabric has been my friend since puberty.  In fact, I believe stretchable fabric has never left me like some of my other friends have.  Always loyal, always true. 
  3. Purchase a "long leg line".  Because 5' 3 1/2" can totally find a "long leg line."
Tops:
  1. Purchase button down shirts and tailored jackets.
  2. Purchase tops long enough to hit the hip area (hit below waist line) to hide the problem area - ya' think?
  3. Purchase ‘V’ neck tops which give a natural slimming effect.

I will blog pear, hourglass, and tube body shapes in future posts. 

What are you creating this weekend?

xoxo,

Tracy


"Every artist joins a conversation that's been going on for generations, even millennia, before he or she joins the scene."  John Barth


References:


Thursday, April 25, 2013

Recipes Rebooted - Swiss Chicken


Today's DELICIOUS recipe comes from my step-mom.  She made this dish for us many years ago and from that moment on, it was a family favorite with my kids.  And it is another EASY recipe.  So here is how you make it:


 You need these ingredients:
4 boneless/skinless chicken breasts
8 (oz) of stuffing mix
Swiss cheese slices
1 can Cream of Chicken Soup
1 stick butter, melted
1/2 soup can of milk


Season the chicken with a little salt and pepper and place in your casserole dish.


Top each piece with Swiss cheese slices. 


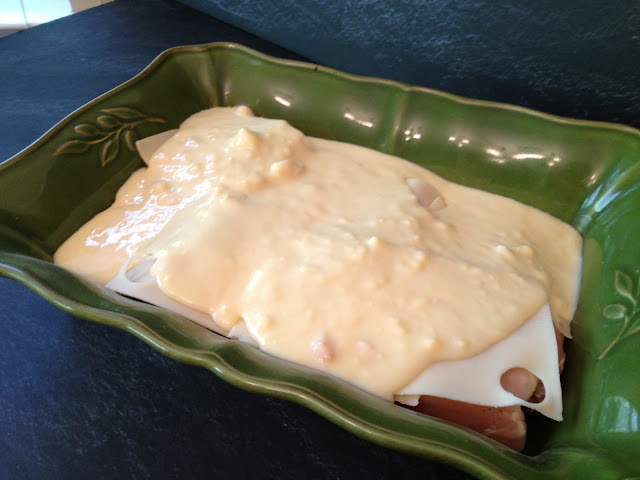
 Mix together your Cream of Chicken soup and 1/2 can of milk until creamy.  Pour over the chicken and cheese. 


 Mix together 8 oz of your choice of stuffing mix and 1 stick of melted butter until moistened. 


Pour over the top of your mixture and smooth out.


And that's it!  Bake at 350 degrees for 40 - 45 minutes or until done.  


The chicken is moist and delicious and the cheese and soup bubble up over the stuffing and it is TRULY the best part of the meal!


Enjoy!

xoxo,

Tracy

Tuesday, April 23, 2013

Friendship Series - The Pursuit of Friendship

To every thing there is a season,and a time to every purpose under the heaven… Ecclesiastes 3:1
   
I’m sure you have seen the email that has made its round on the internet a gazillion times since the beginning of the Internet (when Al Gore invented it).  The one that says something like:

“Some friends are only for a season… Others are for a lifetime.  Forward this email in the next 60 seconds to 10,000 friends otherwise a hairy mole will appear on your face in the morning…”   

Okay, maybe I embellished the last part.  But, you know the one.   

As a woman who has had my share of “come and go” friends, it prompted me to question:  Are friends for a lifetime, or are they just for a season, whatever that season may be? A season may be just a summer, or a season may include all of our lives.   Is friendship fleeting?  Can we women not have life-long friends?  Or are we supposed to come in and out of each others lives as we need each other?

My mom is always saying “Women don’t like me…”  And I, like her, have had my share of revolving friendships.  I will have a friend today and then tomorrow, that person does not want to talk with me any longer.   Or maybe I do not want to talk with them. 

It got me to thinking: We as a society have great examples of great women relationships.   Just look at Laverne and Shirley

Need I say any more? 

Come on!  They are a perfect example!  Two opposite women in a long term friendship who forgive each other their faults and make each other better. 

Sidenote:  Do you remember the episode where Laverne and Shirley join medical studies in order to make a little extra money?  Laverne's is the "sleep deprivation" study and Shirley's is the "food deprivation" study?  OMGoodness!!  It still makes me giggle.

Just watch:


Shirley always believes she has the moral high ground over Laverne, but in the end, Laverne teaches Shirley acceptance and love.

And what about the women on Sex in the City?   Here you have four, very different women.  Yet, through all their flaws, they forgive each other.  Though they are different, they come together and connect.  There appears to be no jealousies.  No envy.  They are very honest with each other, which can be brutal, yet, they are four women who want what is best for each other.  That is always evident in each episode.


I know these are TV shows, but can we women have this type of connection in "real life"?  I have friends that no matter what happens in our lives, we pick right back up where we left off.  We can go years with no contact and when we see each other, it is as if we spoke yesterday... So why do we have to wait so long in between to see each other?  Are our lives so busy that we cannot set aside time for those that we love?  Can our husband and children really not survive without mommy around for a few hours? 

And why are some friends just for a season?  Do we really change that much during the relationship? 

Well, I'm going to be writing about some of the women that have touched me during my life.  I want to explore our friendship and the joy that it brought to my life.  I hope we can enjoy this series together.  What are your great examples of friendship?  Why do you believe that some friendships do not last the test of time?  I'd love to hear your thoughts.

I tell my daughters all the time that "To have friends, you must be a friend." Just like any relationship, friendship must be cultivated, nurtured and valued.   I hope my girlfriends know that they are important to me.

"You can't use up creativity.  The more you use, the more you have."  Maya Angelou


Keep creating friends!

xoxo,

Tracy